
THE STREAMLINED PILOT IS GLUED INTO PLACE, ALSO THE BUILDER'S PLATES AND NYCS SHIELD ARE ATTACHED.(Thanks to Robert Dustin for making them.). A FEW PIPES AND HOSES NEED TO BE PUT ON, BUT AT THIS POINT I'M PRETTY MUCH FINISHED WITH THIS BUILD. FOR MY NEXT PROJECT, I THINK I'LL MAKE A CAMEL BACK, AND MAKE IT REALLY WEATHERED. THIS SIX FOOT LOCOMOTIVE TOOK ME TWO YEARS OF PART TIME WORK TO COMPLETE, BUT IT WAS WELL WORTH EVERY MINUTE. I HOPE YOU LIKE IT. THANKS.
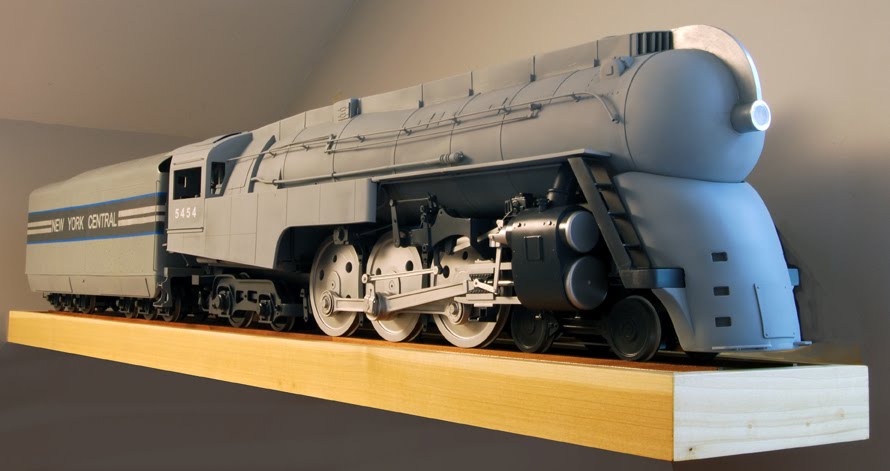 I'M 90% COMPLETE ON THE DREYFUS LOCOMOTIVE PROJECT, ONLY A FEW MORE PARTS TO BE MADE. THIS PHOTO WILL GIVE YOU A GOOD IDEA OF HOW IT WILL LOOK WHEN IT'S FINISHED. ONE MORE PHOTO WILL FOLLOW WHEN I'M DONE. THIS 6 FOOT MODEL WILL BE PERMANENTLY BOLTED TO THE DIPLAY BASE.
 BOTH SIDES OF THE CAB ARE AIR BRUSHED WITH NUMBER 5 4 5 4. AGAIN, I PAINTED WHITE OVER THE COMPUTER CUT TEMPLET, WHEN THE PAINT WAS DRY, I PULLED OFF THE VINYL MASK.
 THE LOCOMOTIVE TENDER IS ALL PAINTED. THE NEW YORK CENTRAL LETTERING, WAS AIRBRUSHED ON USING A COMPUTER CUT VINYL PATTERN. A FEW COATS OF CRYSTAL CLEAR WILL MAKE THE MODEL LOOK GREAT. MORE TO COME.
 ELMER'S WHITE GLUE WAS USED TO MAKE THE RIVETS ON THE SIDE OF THE CAB, THEY WERE APPLIED WITH A SMALL BRASS ROD. JUST DIP INTO THE GLUE AND DOT THEM ON ONE AT A TIME. WHEN DRY, YOU'VE GOT RIVETS! STYRENE WAS USED TO MAKE THE WINDOW FRAME. I'LL ADD GLASS LATER ON.
 AFTER THE CAB INTERIOR WAS PAINTED, I MADE A ROOF OUT OF STYRENE AND GLUED IT INTO PLACE. VENTILATION HATCHES WERE ADDED FOLLOWED BY RIVETS.
 THE CAB OF THE LOCOMOTIVE IS PAINTED, LATER A LIGHT WEATHERING WAS APPLIED. ALL GUAGES ARE HANDMADE.
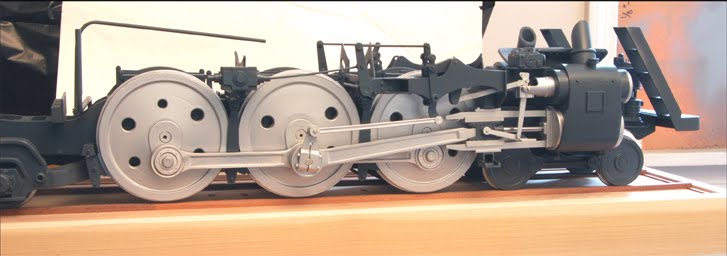 THE RODS AND VALVE GEAR ARE PAINTED IN A BRIGHT SILVER. THE CHASSIS IS ALMOST COMPLETE.
  DETAIL PHOTOGRAPH, SIDE RODS AND VALVE GEAR ARE NEXT FOR PAINT.
 THE CHASSIS OF THE LOCOMOTIVE WAS TAKEN COMPLETELY APART BEFORE PAINTING. I MIXED UP A LARGE AMOUNT OF POLY-S GRAY ACRYLIC PAINT, WHICH WAS APPLIED TO THE MODEL BY AIRBRUSH. THE DRIVE WHEELS WERE PAINTED BRIGHT SILVER AS ON THE PROTOTYPE. STILL, ALOT MORE TO DO. STAY TUNED.
I ADDED THREE NEW ADDITION TO THE STREAMLINED PILOT, TWO STEPS AT THE VERY BOTTOM, SIX STEP UP FOOT HOLES, THREE ON EACH SIDE, AND A COUPLER DOOR.


 I JUST ABOUT HAVE THE VALVE GEAR FINISHED ON BOTH SIDES OF THE LOCOMOTIVE. I'LL COAT THEM WITH ALCLAD STEEL COLORED LACQUER PAINT.
 I SPENT THE OTHER DAY MAKING UP A WATER SCOOP FOR THE UNDERSIDE OF THE TENDER. IT'S MADE FROM STYRENE AND SPRAYED WITH GRAY PRIMER.
 I FINISHED THE RIVETS ON THE TENDER TWO DAYS AGO, WOW! WHAT A PROJECT. TODAY IT WAS TIME FOR A COAT OF GRAY SPRAY PRIMER. MORE TO COME!
 THE SKIRT THAT COVERS PART OF THE TENDER TRUCKS, IS WOOD MOLDING. IT'S THE SAME STUFF THAT IS USED ON YOUR HOUSE, FOR BASE BOARDS, AND CEILING TRIM. SOME PLASTIC DETAIL PANELS WERE ADDED TO FINISH IT OFF. I ALSO MADE TWO STEP UNITS OUT OF STYRENE, TO HELP THE FIREMAN AND ENGINEER UP INTO THE CAB.
 I'VE STARTED THE MADNESS! EACH RIVET IS GLUED INTO A DRILLED AND COUNTERSUNK HOLE (The countersinking helps the rivet lay flat). I USE MY PENCIL LAYOUT AS A GUIDE. THE RIVETS ARE HO AND N GUAGE TRACK NAILS. NOT SPIKES, BUT TRACK NAILS.
 BACK VIEW OF THE TENDER. STILL NEED TO ADD AIR HOSES AND CHAINS, PLUS TWO SMALL STEP UP LADDERS.
WORK ON THE TENDER MOVES FORWARD! PUTTY ALWAYS HELPS TO SMOOTH THINGS OVER. NEXT, THE DREADED RIVETS. MORE TO COME!

FOR SOME REASON, MY BLOG WON'T LET ME PUT ANY MORE PHOTOS AT THE BOTTOM OF THIS POST. OH WELL! THE MODEL IS MOVING ALONG WELL, ALOT MORE DETAILS GOING ON. THIS TENDER HAS TONS OF RIVOTS ON IT, I'M NOT LOOKING FOWARD TO DRILLING ALL THOSE HOLES .
 Air brakes are turned in poly board, with O-rings cut to size for air lines. Some brass and styrene details finish them off.
The drivers are added to the chassis, while the side rods are placed on the cranks for a test fit.

A steam powered water pump sits low on the locomotives chassis. Pipes are solid brass rods, they're just easier to bend.
 This new locomotive will measure around 75 inches long, it sits along side of my newly completed consolidation. More photos to come, stay tuned.
The valve gear hanger and reverse levers, are made of styrene. Twelve brass bolts, were cut from hex stock, and added to the hangers(six on each side). A long length of brass rod connects the two reversing levers.

The boiler for the streamlined Hudson is really taking shape. Each section is first built in wood, then a sheet of polystyrene is carefully wrapped around the form, small brass tacks hold the styrene in place. When the four sections of the boiler are complete, they are glued together, making sure everything is alined. Green Squadron putty helps smooth over any imperfections.

This locomotive has two compound air compressors, I used pvc pipe, brass, and styrene, to model them. When they are fitted to the engine, they will be mostly hidden by the streamline cowling. To finish them up, I sprayed them with a coat of gray primer, all connecting pipes will be added later.

Springs have been added to all six drivers, also the brake hangers are fitted into place.
 The streamlined dome that fits in front of the smoke box, was turned on my lathe, after I was satisfied with the shape, it was spray primed.
The famous Dreyfus nose-dome, is now in place on the front of the smoke box. The rest of the frontal streamline pieces will be totally shaped by hand. The start of the locomotive's headlight sits in the middle of the dome.

THE LOCOMOTIVE IS TAKING SHAPE, NOW, IT'S STARTING TO LOOK LIKE THE 20TH CENTURY LIMITED.

SIX MONTHS OF PART TIME MODELING, AND I'VE PROGRESSED THIS FAR. WITH EACH PART BEING HAND MADE, THE BUILDING OF THIS LOCOMOTIVE IS VERY TIME CONSUMING, BUT WELL WORTH EVERY MINUTE.

PROGRESS HAS BEEN SLOW ON THE LOCOMOTIVE MODEL, BECAUSE OF MY JOB. I'VE BEEN WORKING ON THE CAB'S INTERIOR, AND DOING SOME PLUMBING ON AND BELOW THE BOILER. THE MODEL COMES COMPLETELY APART FOR PRIMING AND PAINTING. SOON I'LL START THE TENDER.

I GOT A CHANCE TO GET SOME WORK DONE ON THE CAB'S INTERIOR, THERE'S PLENTY OF ROOM FOR LOTS OF DETAILS. THIS HUDSON USES A WHEEL IN FRONT OF THE ENGINEER'S SEAT, TO REVERSE THE LOCOMOTIVE. IT ALSO CONTROLS STEAM CUT OFF TO THE CYLINDERS, WHEN THE ENGINE IS RUNNING.
 A FEW WEEKS AGO, I STARTED SOME WORK ON THE HUDSON'S TENDER. IN THE PHOTO, YOU'LL SEE THE TRUCKS I'VE BEEN WORKING ON, THEY'RE MOSTLY MADE OF STYRENE. SOON THEY WILL BE READY FOR GRAY PRIMER.
 THE TENDER BODY IS MADE UP OF BIRCH PLYWOOD, A COVERING OF STYRENE WILL BE GLUED OVER THE WOOD. MANY MORE DETAILS STILL TO GO. THE LOCOMOTIVE MEASURES OVER 6 FEET. MORE TO COME.
7 comments:
Holy Crap that is awesome. How did you do the mechanics? Are they sculpted by you or casts off of pieces or machined? Your attention to detail is immaculate and awe inspiring. Please keep posting these "How To's" for fellow scratch-building modelers.
My name is Atzoletakis Agapitos .I am engineer of airplanes and I deal 40 years with the rc planes and I would want to present the models that I manufacture in Heraklion of Crete. I thank a lot.
Vielen Dank Agapitos
I have a blogspot.
http://aeromodelling-agapitos.blogspot.com
Exquisite! This locomotive is very close to my heart. I am building a model of 5449 in 1/32 scale or 3/8" = 1 ft.
Check out page 211 of Thouroughbreds by Staufer for a good detail picture of the front cab vent window and the cab side windows.
Do you have any good views of the top of the locomotive? I have one partial photo from Trains magazine but it does not show the top of the cab, or the wind deflectors.
I have the Max Grey O scale model with every Precision Scale casting available added to it but the model as made has errors
I really appreciate your posting of your project photos and progress. You are making a fantastic model of my favorite locomotive.
Thank you
Are you a member of NYCHS?
Dave Smith dwsflpe@earthlink.net
Where did you get the design drawings to build from?
I am very interested in the top view of the locomotive.
dave
dwsflpe@earthlink.net
I am building this model in 1/32 scale and would like to see photos of your locomotive from top view.
The location of the hatches and wind deflectors at end of cab roof and in front of cab roof hatches is a question. Also height of front window relative to side windows.
see page 59 of "The New York Central System by Michael Leavy for a top view showing hatches etc.
Dave Smith dwsflpe@earthlink.net
Is the locomotive finished? What has happened? Is the model for sale?
Dave Smith
dwsflpe@earthlink.net
Jimmer,
Take a look at another 3/4 inch scale Hudson. This one appeared in Mechanix Illustrated.
ibls.org/mediawiki/index.php?title=Model_Maker's_Dream_Engine
Daris
IBLS Secretaryu
Post a Comment